Rook Piercing: What You Should Know
Written for Medical Realities by Meghan Gessner on September 10, 2025
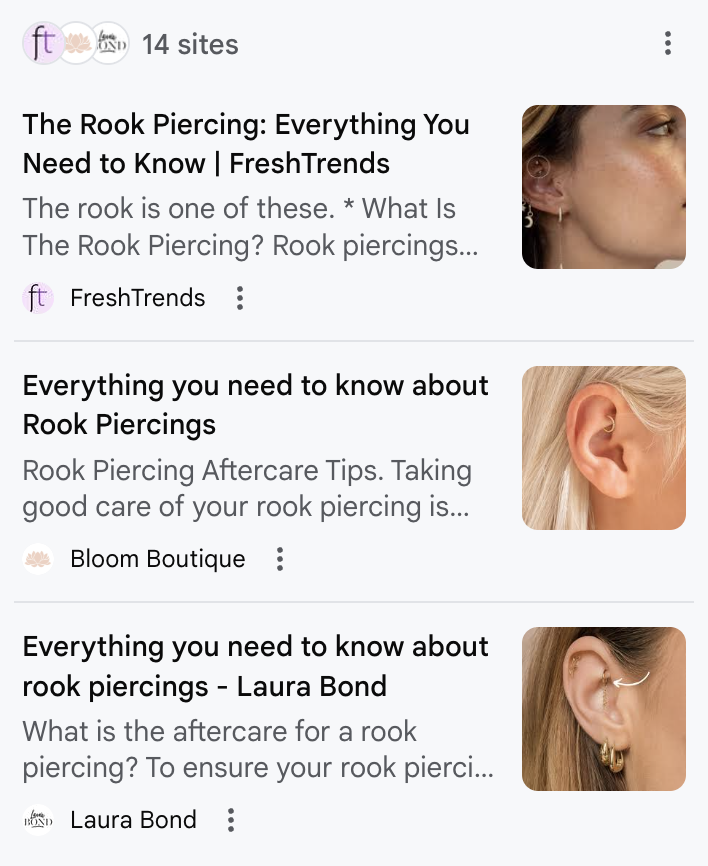
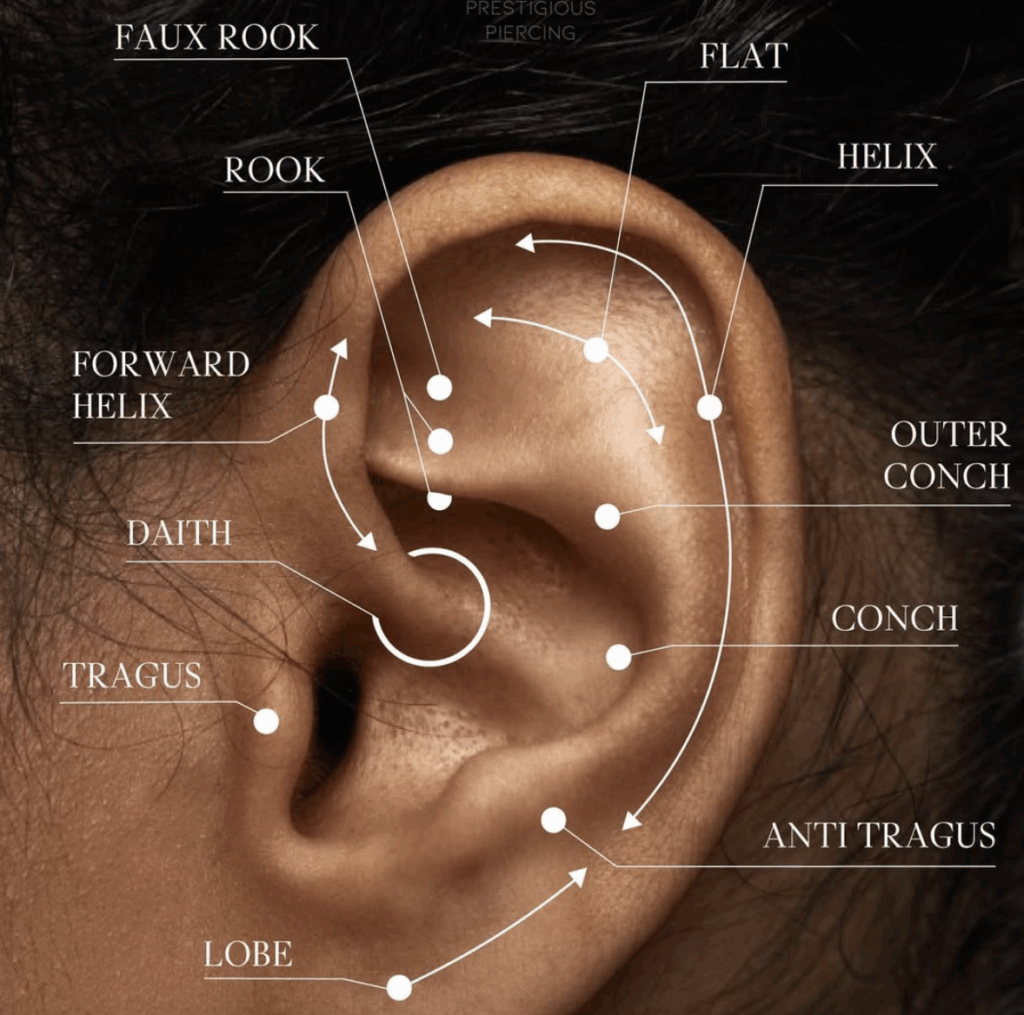
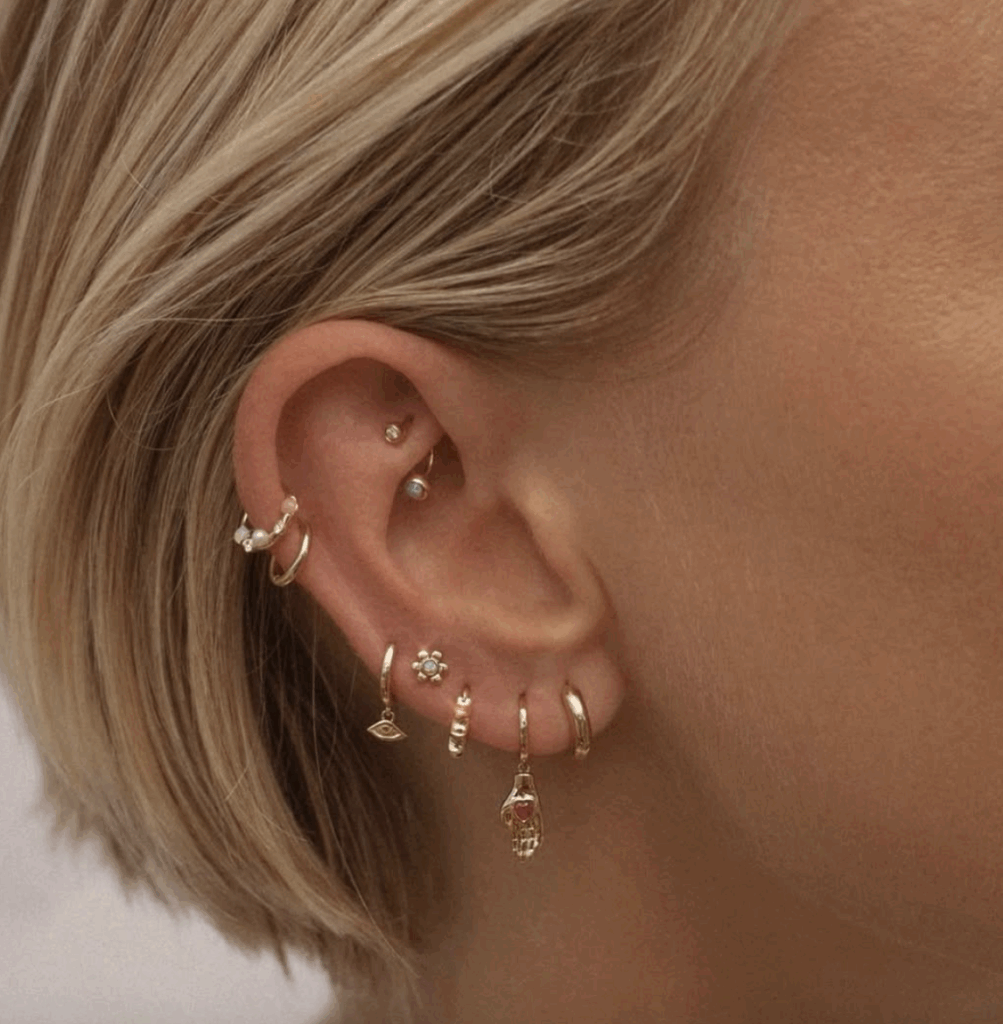
What’s a Rook Piercing, exactly?
A rook piercing goes through that thick little ridge of cartilage above your ear canal, tucked under the outer rim. Because it’s cartilage, not soft earlobe, it needs more TLC and patience. It’s a fave in constellation piercings (those tiny star-map ear stacks), and looks great with a curved barbell or a dainty hoop.
Does a rook piercing hurt?
Short answer: yeah, a bit. Cartilage is tougher than lobe tissue, so expect a sharper pinch and a throbbing ache after. Most folks rate it 6–7/10 for the initial poke, then a dull soreness for a few days. Deep breaths, steady head, and you’re good.
How long do rook piercings take to heal?
Plan on the long game: 3–6 months for most people, sometimes up to 9 months if your ear is fussy or you bump it a lot. It may look fine on the outside way before the inside finishes knitting together, so don’t swap jewelry too early.
What to expect right after
A little redness, warmth, tenderness, light swelling, and a pale/yellowish crust that dries on the jewelry = normal. Tiny fluid-filled bumps (granulomas) can pop up—warm compresses once daily usually calm them down.
Rook piercing aftercare (simple and effective)
- Wash hands first, every time.
- Clean twice daily with sterile saline wound wash or a DIY mix (¼ tsp non-iodized sea salt in 1 cup warm water).
- Let the solution soak; don’t twist the jewelry dry—only wiggle gently when it’s wet if you must.
- Skip alcohol, hydrogen peroxide, and ointments—these slow healing.
- Sleep on the opposite side (or use a travel pillow “donut” to keep pressure off).
- Keep hair, hats, hoodies, and headphones from snagging.
- Hold the pool, hot tub, lake, and ocean plans for the first 6–8 weeks.
- Stick with the starter jewelry until your piercer gives the green light.
How to care for a rook piercing
- Clean twice daily: Clean the piercing two or three times a day using a sterile saline solution, which can be purchased at a pharmacy. Do not use homemade salt solutions, alcohol, or hydrogen peroxide, as these can irritate the skin and delay healing.
- Wash your hands: Always wash your hands thoroughly with antibacterial soap before touching your piercing.
- Avoid unnecessary contact: Do not touch, twist, or play with the jewelry, as this can introduce bacteria and cause irritation and scarring.
- Keep it dry: After cleaning, gently pat the area dry with a clean paper towel or sterile gauze. Avoid using cloth towels, which can snag the jewelry or harbor bacteria.
- Prevent snagging: Be mindful of your piercing when changing clothes, styling your hair, or wearing headphones. Snagging the jewelry can cause trauma to the piercing site.
- Protect it while sleeping: Avoid sleeping on the pierced ear to prevent pressure and irritation. A travel pillow with a hole for your ear can be very helpful.
- Stay out of the water: Avoid swimming in pools, hot tubs, lakes, and other bodies of water until the piercing is fully healed, as they can expose the wound to harmful bacteria.
How to keep infections off your radar
Cartilage has limited blood flow, so cartilage piercing infection can escalate fast. Reduce risk by choosing a licensed pro who pierces with a sterile single-use needle (never a gun) and implant-grade jewelry (titanium, niobium, or 14k–18k solid gold without nickel). Signs to call your piercer or a clinician: increasing pain, spreading redness/heat, thick yellow/green discharge with odor, fever/chills.
Risks associated with a rook piercing
In addition to infection, other complications can arise with a rook piercing.
- Keloids and hypertrophic scarring: Raised scar tissue, known as hypertrophic scarring or keloids, can develop at the piercing site. Proper aftercare and avoiding trauma to the area can minimize this risk.
- Migration and rejection: In some cases, the body may reject the piercing, causing it to shift or push the jewelry out. This can happen with improper placement, incorrect jewelry, or poor aftercare.
- Allergic reactions: Poor-quality jewelry, especially those containing nickel, can cause an allergic reaction in sensitive individuals.
- Trauma: Accidental snagging or bumping the jewelry can damage the piercing and prolong the healing time.
Rook piercing placement & anatomy check
Not every ear has a rook ridge deep enough to pierce. A good piercer will map your ear, mark placement, and have you approve the dot. If the fold is shallow, they might suggest a helix, flat, or conch instead for a similar vibe.
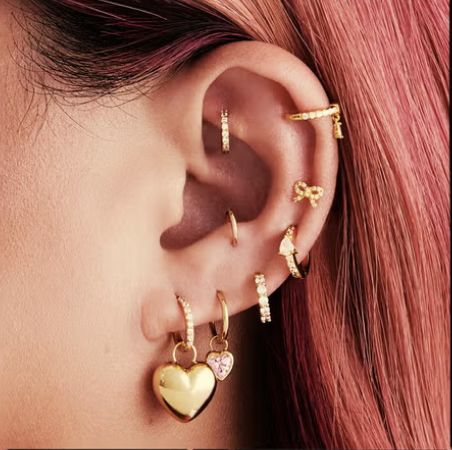
Jewelry basics for the rook
- Initial piece: usually a curved barbell (less movement, less pressure).
- Upgrades later: micro hoops, clickers, or decorative barbells once healed.
- Materials: ASTM F-136 titanium, ASTM F-67 CP titanium, niobium, or solid 14k–18k gold (nickel-free). Avoid plating and mystery metals.
Day-to-day lifestyle tweaks
- Phone on the non-pierced side; go for over-ear headphones that don’t press the rook.
- Wash pillowcases often; keep beanies/hoodies clean.
- Be gentle when brushing or styling hair—clips and combs love to catch on new piercings.
- If you’re active, use a sweatband and clean right after workouts.
Possible bumps in the road (and what to do)
- Irritation bump: usually from friction, pressure, or snagging. Fix the cause (no sleeping on it, swap to a longer/shorter bar if needed), then saline soaks.
- Granuloma: warm compress + saline; check jewelry fit with your piercer.
- Keloid-prone? Talk to your piercer first; consider alternative placements.
- Migration/rejection (rare in rook): if the tissue thins or jewelry edges surface, see your piercer ASAP.
Quick safety checklist
- Pro, licensed piercer with a clean studio
- Needle (not a gun)
- Implant-grade metal
- Written aftercare you can follow
- Scheduled check-ins for downsizing and healing progress
Keep Your Rook Happy: Real-World Aftercare That Works
Why rook piercings need extra TLC
Cartilage doesn’t get much blood flow, so a rook piercing heals slower than a lobe. That’s why solid cartilage piercing aftercare matters from day one and why the risk of a rook piercing infection is a bit higher if you cut corners.
How infections actually happen
Germs sneak in when studios don’t use sterile tools, when you touch the area with unwashed hands, when you yank out starter jewelry too soon, or when you skip cleanings. Swimming early on (pools, lakes, hot tubs) also bumps up infection risk.
The most effective way to prevent infection is by adhering to a strict aftercare regimen and choosing a reputable piercer.
- Choose a reputable piercer: Always get pierced by a certified and experienced professional who uses new, sterilized equipment. A piercing gun should never be used on cartilage, as it can cause significant trauma.
- Wear high-quality jewelry: Opt for hypoallergenic materials like implant-grade titanium, 14k gold, or niobium, which reduce the risk of an allergic reaction and irritation.
- Be patient: Allow the piercing to heal completely before changing your jewelry. A rook piercing can take 6 to 18 months to fully heal.
- Recognize signs of infection: While some swelling, redness, and crusty discharge are normal in the first few weeks, more serious signs of infection include excessive pain, warmth, a burning sensation, or thick, green, or yellow pus.
Signs you should call your piercer or a clinician
Watch for heat, spreading redness, pulsing pain, thick yellow/green discharge with odor, fever or chills, or the jewelry starting to sink in or press out. Any of those can mean your rook piercing healing time is going the wrong direction.
The “don’ts” that save you weeks of drama
- Don’t DIY anything—no kitchen-table piercing or home “fixes.”
- Don’t pick off crust; soak it off with saline.
- Don’t use bath towels on the site; air-dry or pat with a clean paper towel.
- Don’t twist the jewelry when dry; if you must adjust, only while the area is wet with saline.
A simple daily routine (that people actually stick to)
- Clean twice a day with sterile saline wound wash (or ¼ tsp non-iodized sea salt in 1 cup warm water). Soak—don’t scrub.
- Wash hands first, every single time.
- Sleep on the opposite side; a travel pillow helps keep pressure off.
- Keep hair, hoodies, hats, and headphones from rubbing the entrance/exit points.
Choosing rook piercing jewelry that won’t fight you
Starting with the right rook piercing jewelry can shorten headaches and flare-ups. Most pros recommend a slightly longer curved barbell at first—less movement and pressure than a hoop while swelling settles. For materials, go with implant-grade titanium (ASTM F-136/F-67), niobium, or solid 14k–18k gold that’s truly nickel-free. If you’re searching for the best jewelry for rook piercing, skip anything plated or mystery-metal; ask the studio to confirm ASTM/ISO specs.
Rook Piercing Jewelry 101
For a fresh rook, the gold standard is a curved barbell. That bend follows the fold of cartilage, gives your ear room to swell, and doesn’t spin like a hoop. Most pros start you with implant-grade titanium (nickel-free, super light, skin-friendly) so your ear can chill while it heals.
Best Starter Choice (Day 1)
- Curved barbell (aka banana bar): minimizes friction, easy to keep clean, less torque on the piercing channel.
- Material: Implant-grade titanium (ASTM F-136/F-67) is the go-to for sensitive skin and new piercings.
- Gauge & length: Commonly 16g with a slightly longer post at first to allow for swelling; your piercer will size it to your anatomy.
Why Not a Ring Right Away?
Hoops look great, but they move—a lot. That extra motion can irritate cartilage and slow things down. Most folks wait until the rook is fully healed before switching to a ring or a slimmer curved bar.
Materials That Play Nice With Cartilage
- Implant-grade titanium: Nickel-free, lightweight, and highly biocompatible—top pick for the initial heal.
- Niobium: Similar vibe to titanium; great for sensitive ears once you’re healing well.
- Solid gold (14k–18k): Awesome for healed piercings. Choose nickel-free alloys; skip gold-plated for fresh piercings.
- Platinum: Premium, durable choice for healed piercings.
- High-quality steel (implant grade): Fine for many after healing; avoid mystery alloys.
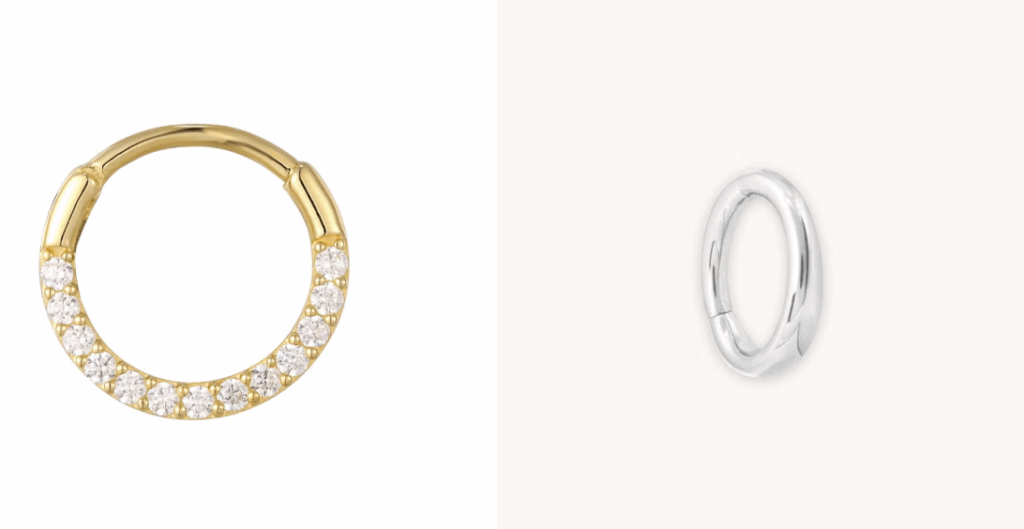
When Can You Swap to a Hoop?
After your piercer clears you—typically several months, since rooks heal slow compared to lobes. Once it’s stable, you can switch to:
- Seam ring (sleek, minimal)
- Captive bead ring (classic look, tiny bead closure)
- Clicker (easy on/off mechanism and tons of designs)
Size & Fit Tips
- Gauge: Most rooks are 16g; some anatomy takes 18g. Stick with your pro’s recommendation.
- Diameter (for hoops): Must clear your fold without pinching—usually small diameters; your anatomy decides the number.
- Downsizing: Expect a follow-up visit to shorten the initial bar once swelling is gone. That reduces snagging and pressure.
Popular Styles to “Buy Now, Wear Later”
- Titanium curved barbell with flat disc ends: Low-profile, comfy under headphones and hats.
- Dainty clicker ring (once healed): Micro-pavé or smooth finish for a subtle sparkle in the rook fold.
- Gold curved barbell (healed only): 14k–18k solid gold with tiny opal or diamond ends for a dressed-up stack.
Quick Care Reminders
- Hands off unless you’re cleaning. Less movement = happier cartilage.
- Stick with sterile saline soaks; avoid alcohol and peroxide.
- Sleep on the other side or use a travel pillow to keep pressure off.
| Material (US market) | Typical Price* | Quality & Durability | Biocompatibility / Allergy Risk | Weight & Comfort | Color/Finish Options | Best Use (Initial vs. Healed) | Popularity (US) | Notes You Should Know |
|---|---|---|---|---|---|---|---|---|
| Implant-grade Titanium (Ti-6Al-4V ELI, ASTM F-136) | $20–$80 per piece | Excellent scratch/corrosion resistance | Highest (nickel-free, implant grade) | Light; comfy in cartilage | PVD colors (gold, rose, black), polished | Initial & healed | ★★★★★ | Gold standard for rook starts; great for sensitive skin; low maintenance |
| Niobium | $18–$60 | Very good; slightly softer than Ti | Very high; nickel-free | Light; comfy | Anodized rainbow tones | Initial (okay) & healed | ★★★★☆ | Hypoallergenic; fewer brand options than Ti |
| 14k–18k Solid Gold (nickel-free alloys) | $80–$250+ | Excellent if solid; 18k softer | High if nickel-free; avoid cadmium | Heavier than Ti/Nb but still comfy | Yellow/white/rose; gems | Initial (only with reputable, nickel-free posts) & healed | ★★★★☆ | Luxury look; verify alloy & hallmark; avoid gold-plated for fresh piercings |
| Surgical Stainless Steel (ASTM F-138) | $12–$40 | Good; durable | Moderate—may contain trace nickel | Medium weight | Polished, some PVD | Healed; not ideal for very sensitive skin | ★★★☆☆ | Budget option; choose verified ASTM F-138 only |
| Platinum | $250–$600+ | Exceptional; won’t tarnish | Very high | Heaviest; still wearable | Bright white finish | Healed (occasionally initial via pro studios) | ★★☆☆☆ | Premium price; fewer styles in rook sizes |
| PTFE/Bioflex (medical-grade) | $10–$25 | Flexible; won’t corrode | High (if medical-grade) | Ultra-light; flexible | Clear/neutral | Healed; sometimes for medical/scan needs | ★★☆☆☆ | Useful for MRIs or procedures; can scratch/cloud over time |
| Borosilicate/Soda-lime Glass (lead-free) | $10–$30 | Good if high-quality | High | Light-medium | Clear, some colors | Healed only | ★★☆☆☆ | Smooth surface; limited rook-friendly shapes; avoid for fresh piercings |
| Acrylic/Plastic | $5–$15 | Poor; scratches/cracks | Variable; can irritate | Ultra-light | Many colors | Healed only (short term) | ★★☆☆☆ | Not for initial piercings; can harbor bacteria and warp |
| Wood/Horn/Bone | $12–$40 | Moderate; organic materials | Variable; porous | Very light | Natural tones | Healed only (short wear) | ★☆☆☆☆ | Porous—holds moisture/bacteria; avoid for fresh piercings or long wear |
*Prices are ballpark retail per single piece (not pairs) in U.S. piercing studios/online shops and vary by brand, gem size, and finish.
Pro studio quick checks (USA)
- Look for ASTM F-136 (titanium) or ASTM F-138 (steel) stamps in listings.
- For gold, ask for solid 14k–18k, nickel-free alloys, and reputable makers.
- For rook starters, most studios use 16g curved barbells (sometimes 18g) with extra length for swelling, then downsize after 6–10 weeks.
Top 3 Most-Popular Jewelry Styles for Rook Piercings (US)
- Curved Barbell (Starter Classic)
- Why: Sits neatly in the rook fold, less torque than rings, easier healing.
- Typical spec: 16g, flat-back or ball ends; titanium or 14k gold.
- Flat-Back Labret Post with Tiny Gem/Cluster (After Downsize)
- Why: Low-profile front, comfy back disc minimizes snagging on hair/hoodies.
- Great for: “Constellation” ear stacks, subtle sparkle.
- Hinged Segment Ring / Seamless Ring (Healed Only)
- Why: Clean minimalist look once fully healed; easy to click in/out.
- Tip: Choose a small inner diameter sized to your anatomy to avoid pressure.
How long rook piercings take to heal (for real)
Plan on several months, not weeks. Typical rook piercing healing time runs 4–9 months, sometimes a bit longer depending on anatomy and aftercare. It may look healed on the outside at 8–10 weeks, but the inside is still knitting—changing jewelry early is a classic way to trigger a setback.
Extra tips to dodge bumps and irritation
If you notice a small, fluidy irritation bump (not a keloid), warm saline soaks once daily can help. Reduce pressure (no sleeping on it), keep products off the area (no hairspray, makeup, or heavy lotions near the channel), and make sure your cartilage piercing aftercare is consistent—same times, same steps, every day.
Rook Piercing — Real-World FAQ (US)
What exactly is a rook piercing?
How much does a rook piercing cost in the U.S.?
Does a rook piercing hurt more than a helix?
How long does a rook piercing take to heal?
What jewelry is best to start with?
Can I get a rook with small ears or a shallow fold?
Day-to-day care: what’s the routine?
What are normal healing signs vs. red flags?
Red flags: worsening pain, heat, thick yellow/green discharge, fever, or jewelry embedding—see a pro/clinician.